
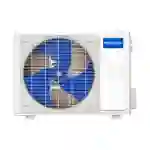

If you want to heat and cool one room, an addition, a garage, or a workshop without cutting into walls for ductwork, the Mr. Cool DIY single-zone mini-split deserves a close look. MRCOOL® launched its first-generation DIY® Single Zone Mini-Split in 2014, and it changed how homeowners think about HVAC. Instead of waiting on an installer, you can handle much of the work yourself.
This guide explains what a single zone system is, who it suits, how installation works, and what to plan for before you buy.
What Is a Single Zone Mini Split?
A single-zone mini-split pairs one outdoor unit with one indoor unit. The two connect through a refrigerant line set plus power and communication wiring. There are no ducts, no vents, and no major construction project.
Because it is ductless, it delivers conditioned air directly into the room where the indoor unit is mounted. As a heat pump, one system can cool your space in summer and heat it in cooler months.
Why Homeowners Choose the DIY® Series
Traditional HVAC has long meant scheduling an installer and paying for specialized labor. MRCOOL built the DIY® line to remove that friction. The key is the pre-charged Quick Connect® line set, which eliminates the need for specialized refrigerant handling during installation. MRCOOL secured patents for these line sets in 2021, and the company states the DIY® Series is the only ductless mini-split heat pump with patented technology designed to simplify homeowner installation.
Other reasons people choose a single zone system:
- Targeted comfort: Condition only the space you actually use.
- No ductwork: Ideal for additions, converted garages, sunrooms, and older homes without ducts.
- Modern options: The DIY® 5th Generation line shows how far the series has come since the original 2014 launch.
- Smart features: MRCOOL has invested in smart home integrations, so check which controls your chosen model supports.
Is a Single Zone System Right for Your Space?
Single-zone systems work best when you want to condition one open area or a group of connected rooms. Common uses include:
- Bedrooms and home offices
- Garage workshops and basements
- Guest houses and sunrooms
- Room additions
If you need independent control over several separate rooms, a multi-zone setup may fit better. MRCOOL also offers multi-zone options within its DIY® family.
Sizing matters just as much as location. An undersized unit runs constantly and struggles on extreme days. An oversized unit cycles on and off and can handle humidity poorly. Room size, ceiling height, insulation, window area, and local climate all affect the right capacity. The System Selector, currently labeled "Beta" on the MRCOOL site, is a useful starting point for narrowing down a match.
How a DIY Installation Works
The exact steps vary by model, so always follow your installation manual. In general, the process looks like this:
- Pick your locations. Choose an interior wall with clear airflow for the indoor unit and a level, well-ventilated spot for the outdoor unit.
- Drill the wall opening. A small hole carries the line set, drain line, and cable between the units.
- Mount the indoor unit. Use the supplied bracket and a level.
- Set the outdoor unit. Place it on a solid pad or wall bracket.
- Connect the pre-charged line set. The Quick Connect® fittings are designed to join without handling refrigerant.
- Finish wiring and test. Complete the power and communication connections, then run the system.
What You Still Need to Plan
DIY does not mean no preparation. Before you start, think through the following:
- Electrical requirements: Mini splits typically need a properly rated circuit and disconnect. Local codes may require a licensed electrician for this part.
- Permits and inspections: Some areas require them, so check with your local authority.
- Condensate drainage: Plan where the water will go before you mount anything.
- Tools and help: Expect to use a drill, level, and stud finder. Outdoor units are heavy, so line up a second person.
- Warranty terms: Read the requirements before you begin so you do not put coverage at risk.
Costs and Rebates
Installing the system yourself can reduce labor costs, though you should still budget for mounting hardware, electrical work, and any permits. Energy-efficient heat pumps may also qualify for incentives, so visit the MRCOOL Rebate Center to see what is available before you buy.
Final Thoughts
The Mr. Cool DIY single-zone mini split makes sense when you want focused, ductless comfort without the traditional installation hassle. Size it correctly, plan your electrical and drainage needs, follow the manual, and call a professional for any part of the job you are not comfortable handling.
Frequently Asked Questions
1. Is the Mr. Cool DIY single-zone mini-split really DIY-friendly?
The pre-charged Quick Connect® line sets are designed to simplify installation by removing the need for specialized refrigerant handling. Mounting and wiring still require care, so follow the manual closely.
2. How many rooms can a single-zone mini-split cool and heat?
It serves the area around one indoor unit. It works best for one room or an open, connected space. For several separate rooms, consider a multi-zone system.
3. Do I need a licensed professional?
Not necessarily for the mounting and line set connection, but electrical work and local permit rules vary. Check your local codes, and hire a licensed electrician if required or if you are unsure.
4. Can it provide heating as well as cooling?
Yes. MRCOOL's DIY® mini splits are heat pump systems, so they can both cool and heat.
5. What refrigerant do current MRCOOL systems use?
MRCOOL transitioned its product lines from R-410A to R-454B in 2025. Always confirm the refrigerant for your specifications